Home     About     DIY     Recipes     InStitches    Contact
Showing posts with label DIY. Show all posts

17.9.14

DIY Hand painted Skirt

Hand painted Skirt photo paintedskirt2.jpg

I made this skirt ages ago (more on that later). It just never really clicked with me. I mean, it was always just OKAY in my mind. A good staple, but a bit boring. Do you what I mean? I'd been playing around with the idea of hand printing fabrics for ages but I didn't have a specific project in mind. Then it hit me. What my skirt needed was some personality. It needed some zing. What it NEEDED was some hand printing. I played around with the idea of handprinted triangles or parallelograms, but after a failed experiment I decided to go with imperfect swipes with a paintbrush.

Zing badabing. It was just what this skirt needed.

Hand painted Skirt photo paintedskirtdetail.jpg

I used a bronze textile paint and an acrylic paintbrush, laid the skirt out (with newspaper inside the skirt so that the paint didn't bleed through), and had it! It was a simple project that I knocked out in an afternoon. After the paint dried I set it with a hot iron so that the paint wouldn't wash out.

Now I have a skirt that I finally love.

Hand painted Skirt photo paintedskirt3.jpg

21.3.14

In Stitches: Audrey's Bathing Suit

So, the week after after I made my resolution not to buy any clothes this year for me and my girls and to sew any new clothes instead I realized... oh dear. We have a pool party to attend to. And Audrey didn't have a bathing suit. DOH!

I had to make one. It was my only option.

I scoured the internets for a decent toddler one piece but couldn't find one I liked. The bathing suit needed to have low-cut legs, good coverage on the bottom, simple, and well... cute! But not too frilly. Needless to say, I didn't find one. So I drafted my own (eek!) and I'm pleased with how it turned out!

DIY Bathing Suit photo suit_sporting2.jpg
DIY Bathing Suit photo suit_sporting.jpg

I used a pair of undies that fit really well for starting out my pattern and worked it out from there. Simple, cute, and easy to put on! Audrey loves it too. Winner winner, chicken dinner.


To see my haphazard method of how I made this bathing suit, check it out after the jump

7.2.14

In Stitches: Navy 3/4 Tee for Audrey

Navy T-Shirt - In Stitches 2014 photo tee_A1.jpg
Navy T-Shirt - In Stitches 2014 photo TEE_A2.jpg
Navy T-Shirt - In Stitches 2014 photo TEE_A3.jpg
Navy T-Shirt - In Stitches 2014 photo TEE_A4.jpg

YEWW! My first (successful) self-drafted pattern! I had this stretchy, soft knit lying around for ages and wanted to make Audrey a t-shirt out of it since she is running out of her basics. I borrowed a friend's overlocker for the first time and lemme tell you... life changing! I've made four t-shirts because it's so LOVELY to use! QUICK! Gotta go make some more...

I don't have much to say about this shirt except that it's exactly what I wanted (which up until recently rarely ever happened!). It's casual, comfy, and baggy in a fits-just-right sort of way. The banding around the arms that matches the neckline gives it a special touch. The only thing is that I haven't hemmed the bottom because I ran out of navy thread, but I kind of like how knits just roll up and don't fray! Definitely loving this shirt. I'll be making more of these!

x


8.1.14

DIY Play Kitchen

DIY Play Kitchen photo playkitchen1.jpg
DIY Play Kitchen photo playkitchen2.jpg
DIY Play Kitchen photo playkitchen5.jpg
DIY Play Kitchen photo playkitchen7.jpg
DIY Play Kitchen photo playkitchen3.jpg
DIY Play Kitchen photo playkitchen4.jpg
DIY Play Kitchen photo playkitchen8.jpg
DIY Play Kitchen photo playkitchen6.jpg
 photo playkitchen9.jpg

My husband is a brilliant man. I mentioned that I wanted to make Audrey a play kitchen for Christmas. After a few drawings and after much discussion we settled on it delivering it sometime during Phil's vacation time (but wouldn't be finished in time for Christmas). I originally imaged something simple and wooden, without much detail. What we got, though, is a gorgeous miniature country kitchen that I am a little envious of. Phil built the frame out of new timber but the sides, benchtop, faucets, sink bowl, hinges, and doorknobs are all recycled materials. The sides are made out of wooden floorboards and the faucets were found in a trash heap (years ago! We've had them saved ever since). The sink is a metal bowl that I found at a thrift store. The bench top are two wooden shelves that Phil sanded down and fit together to make it deeper. The result is beautiful!

Audrey loves her little kitchen and faithfully makes me 'tea' and 'coffee' and 'dinner' all day long. She carefully lays out the dishes and pretends to wash her hands over and over. It's a treat to watch her play and enjoy something that we* made by hand.

Next is a stove/oven and a little pantry.

*Okay. Phil made it. I just stood around and clapped when things got particularly exciting. Also, I helped paint. But let's not get confused... Phil was definitely the brains AND braun behind this operation. MY HUSBAND IS AMAZING.

18.12.13

Easy Face Scrub

Simple Face Scrub
Okay guys. Let's talk skin care. (^Look! Me without makeup*. Actually... I usually don't wear makeup. But yeah.)

I luuuve taking care of my skin. My skin isn't perfect but I like to take care of what I've got! I'm not into the fancy, just the simple; but I think a little care goes a long way! My grandma inspired me early on to take care of my skin. She started using a simple face lotion every day in her early 20's and let me tell you... girlfriend has GREAT skin and minimal wrinkles. I've taken a page from her book and I lotion my face daily before bed. I drink lots of water to hydrate my skin from the inside out. (WATER, guys. WATER!! It's good for you.) Aside from that, I exfoliate my skin once a week using a simple face scrub. It sloughs away the dead skin and allows the lotion to sink in better giving my skin a healthy glow. Because who wants to waste lotions and serums on dead skin. Amiright?

Okay. So here's how. You'll need:

Table salt
Baby shampoo

That's it.

Simple Face Scrub
Take a palmful of salt in your hands. Don't get fancy. Use the cheap stuff.

Simple Face Scrub
Add in a small amount of baby shampoo. For me it's half a pump. You'll need a bit less than you think. Erm... well it's always a bit less than I think anyway. When I add too much shampoo I have to add in a bit of extra salt to keep it from being too soapy. You're aiming for more of a paste that you can scrub in there.

Simple Face Scrub
Mix it into a thick paste then slather and scrub your face. Don't get any into your mouth because it tastes naaaaaaasty. Ask me how I know... Rinse and enjoy your healthy glow!

I always finish with a little lotion to keep my freshly exfoliated skin from drying out.

Simple Face Scrub

If you're more into the store bought treats I loooove me the Ocean Salt scrub from Lush**. It has a moisturizer in it so it's a little more luxurious (and heavier) than my homemade version so I use it more like a treat than a regular scrub. But um... if you're wanting to get me something for Christmas. I wouldn't object to this, yaknow?

*Actually my eyebrows are tinted. It lasts a few days so it kiiiinda doesn't count?
**Not a sponsored post. I just like Lush. It feels weird that I have to add this as a disclaimer. Annnywaaaay... as you were.

18.11.13

In Stitches: What I've Been Sewing

I've had a major sewing bug lately. I've been sewing lots for myself and the girls, partially born out of necessity and partially because lately things have just CLICKED for me lately and I feel confident in my ability to produce beautiful quality items of clothing. Like... FINALLY! It's a good feeling.

Ever since I announced I was going to start sewing for my new project: In Stitches I've been busy behind the scenes researching and trying and learning and growing. I've been slack with blogging about it but I finally have some items to show for it. I have more that I need to properly document but I'll save that for another time as I want to go over the techniques I learned with those pieces.

In Stitches, update, sewing, sew, wiksten, tank, knit, dress
In Stitches: sewing update, knit dress, todder

First up, I've got two Wiksten tanks. I've made this pattern before and it just doesn't get old. I'll happily make more for myself. I also have plans to modify it into a knee length dress with a wide ruffle at the skirt hem. and a knit dress that I made for Audrey out of an old knit skirt of mine. For the dress I modified a pattern and drafted up a new portion of it to make a cute dress. I love how it turned out!

Resource: The Wiksten Tank

In Stitches: sewing update, undies, kids, toddler

Next, I've made some undies for Audrey. She's super tiny and I've had a lot of trouble finding any undies that fit her. Every time she jumped up and down her undies would fall down and she would cry, because... annoying! hahah So I KNEW I had to make her own. I was pretty nervous about it but I found a great pattern via Mend and Make New and it's really easy! They fit beautifully! They don't gape when she climbs on things and forgets to keep her skirt down. They stay put and they are super modest. This ticks all my boxes when it comes to kid undies. I'll be making these for a good long while in several different sizes. (And maybe upsizing them for me? Cause I need some good comfy undies. Who doesn't. AMIRIGHT?)

Resource: Children's Undies Downloadable PDF Pattern by thatdarnkat


In Stitches, sewing, sew, Olivia top, dress

Lastly, I've been making these cute dresses! Let me just stop and say I LOVE LOVE LOVE this pattern. It's the Olivia Top & Dress by Craftiness is not optional. I LOVE IT. Have I said that? It's a great basic pattern that is easy to modify or add a lining to. I've made three so far and plan to make a few more in different patterns and variations.

Resource: The Olivia Top & Dress


Next up on my sewing list is:

  • More undies for Audrey (I have made 5 and I have 6 more cut out ready to start working on this evening)
  • A Wiksten tank modified to a knee length dress
  • The Aubépine by Deer and Doe (CANNOT WAIT!!)
  • Zinnia by Colette Patterns
  • The Roxanne by Victory Patterns
  • Some bathing suits for the girls (I plan to draft some patterns myself. Eek!)
  • A triangle quilt
  • An ironing board, sewing machine, and overlocker covers for a swap with Gertrude Made. (SO EXCITED)
  • Some simple t-shirts for Audrey
  • Leggings for the babies
  • A winter jacket for Audrey
  • A couple knit dresses for Audrey (SO easy to wear in the summer)

5.10.13

DIY Turban Headband

DIY Turban Headband
DIY Turban Headband

My hair is a mess these days. I mean, who even has time for that? You ladies with kiddos with perfectly tamed locks... WHO ARE YOU?! My solution for keeping my hair in check is this easy turban headband. I give my hair a quick brushing (if Im lucky) and slip this on over top of my mane. Easy peasy! Here's how to make your own.

You'll need:
A strip of jersey fabric, approx. 36" long (a little longer couldn't hurt)
Scissors
Thread

DIY Turban Headband
First begin with cutting a long strip of your jersey fabric. I cut mine about 36 inches long and 6 inches wide. I used a thicker fabric but if you use a thinner fabric you could make the fabric wider so you have a nice knot in the finished turban.

DIY Turban Headband
Fold your fabric in half with the right sides together to form a loop. Using a zig-zag stitch, sew the seam together. Now you have a large loop!

DIY Turban Headband
Lay your loop out and cross in the middle to form a figure 8.

DIY Turban Headband
Twist the loop two more times. The twist will become the knot in the turban headband.

DIY Turban Headband
Bring the two loops together. You now have your finished headband!

DIY Turban Headband

I made a matching one for Audrey but she wasn't interested. She took it off roughly .002 seconds after I put it on.

So I forced Margaret to wear it instead.

DIY Turban Headband

20.8.13

A sling for Audrey

I'm a big fan of baby wearing. I will hold or wear my babies constantly, so wearing a sling around the house while I do housework makes a lot of sense for me! Baby is close and I can carry on with my day. Win win win.

Audrey is sooo observant these days! Lately she's been mimicking me and Phil a lot. She bounces her favorite stuffed puppy up and down to rock it to sleep. She changes her puppy's nappy. So when I looked down to see Audrey with Phil's safety glasses around her neck and her bunny sitting in it like a sling I shouldn't have been surprised. But how brilliant is that!! So I decided to make her a sling of her own. She loves it!

baby doll sling

baby doll sling
baby doll slingbaby doll sling

Killing me with cuteness.

23.7.13

Project: In Stitches

project-sew

Lately I've had this growing desire to get more serious about sewing my own clothes. I've made a few pieces here and there, I've even made a skirt or two from scratch, and I've definitely altered a lot of store bought clothing. But I've had this itch lately about wanting to take my sewing to the next level. I want to challenge myself and learn new skills. I actually want to be able to dream things up and sew it and make it happen. The thought of it is daunting to me but I'm ready to give it a try.

Welcome to 'Project: In Stitches'.

This series will follow my journey in sewing more clothes for myself. I'll attempt to fatten my wardrobe with minimal costs by sewing things myself. I'll challenge myself to grow and learn new skills (Hello to invisible zippers and mastering knit fabrics!). And I'll strive for quality and ending up with a wearable piece that doesn't... y'know. Look homemade.

I plan on sewing a few dresses, a few tops, revisiting some patterns I've already made before (to get more mileage out of them), and will alter some clothes that just don't fit quite right.

I'm kind of really excited. And a bit nervous?

project: tmdm

Join in with me!

12.6.13

Keeping Our Toes Cozy

knitting, pattern, DIY, tutorial, knit, slipper-socks, socks, slippers
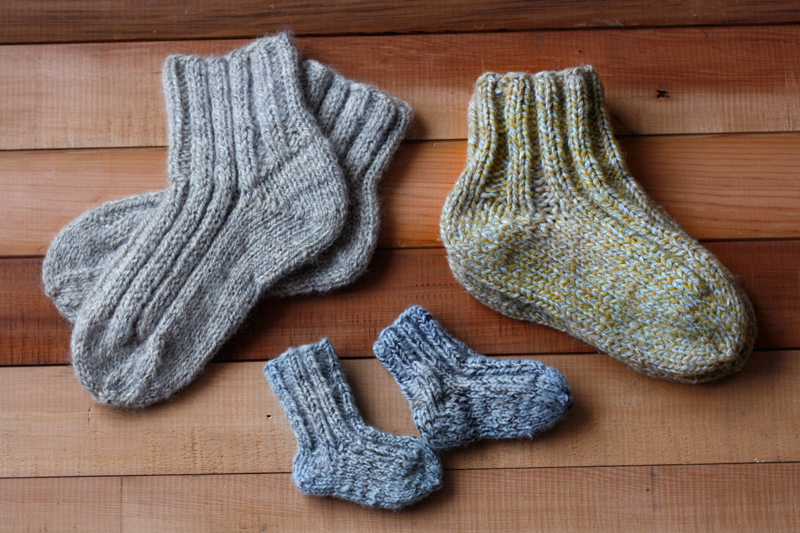
As I put my knitting needles down after finishing my third pair of slipper/socks this season I felt extremely grateful for being able to knit things for my family to keep them warm this winter. It's a little thing but it blesses them in a tangible way and in turn blesses me. It fills me with joy to feel like I am able to clothe and care for my loved ones.

I've been making these slipper-socks for myself for years using a simple sock pattern formula. It can be adapted to use any size needles or yarn and sized up or down to fit tiny baby feet or big man feet. It's a very versatile pattern. It does require a bit of swatching though to ensure that you get a good fit with the yarn, needles, and sock size. I'm hesitant to share this pattern formula though as it might be a bit confusing. If you find yourself lost drop me a line and I'd be happy to help!

------------

Slipper-Socks Knitting Pattern Formula
Note: This method of socks requires knitting in the round with multiple needles. There is NO seaming (which is why it's my favorite go-to pattern).

-GETTING STARTED: To begin, I cast on the amount of stitches required to make an ankle cuff. This is where swatching is important. This number will change depending on the sock-size, yarn, and needles.

For the big socks above I used a chunky handspun yarn and big needles, so I only needed to cast on 36. I've made proper socks using this pattern for a small women's sock and cast on 56. So it just depends. Swatch! Swatch! Swatch! Once the ankle cuff is fitted the rest of the sock generally fits like magic.

-THE CUFF: Knit in 2x2 or 1x1 ribbing until the desired length of the cuff is reached. I like a medium-length cuff.

-THE HEEL: To work the heel I always do a short-row heel as it's easy to memorize and there is no seaming. I simply work the heel on HALF the number of total stitches.

-THE FOOT: After the heel is turned continue knitting the heel (now the bottom of the sock) in stockinette stitching and the top of sock in ribbing until the required length of the foot (minus the toes! We're getting to that!)

-THE TOE:
Note: Requires a set of 4 needles. The stitches are divided with half of them on needle #2 and one quarter each on needles #1 and #3. The division between needles #1 and #3 is centered at the back of the heel or under the foot, decreasing at the end of needle #1, the beginning and end of needle #2, and beginning of needle #3. (phew. Are you with me? Once the stitches are divided properly it's much easier than it sounds!)

Round 1: Knit to 3 sts from the end of needle #1, K2tog, K1. K1, SSK at the beginning of needle #2, knit to 3 sts away from end of needle #2, K2tog, K1. K1, SSK at the beginning of needle #3, knit to end of round.
Round 2: Knit plain.

Repeat these two rounds until you have reduced the number of stitches on each needle by half. Continue to work decrease round only until 6-8 stitches remain. Graft the toe together using a kitchener stitch or draw the stitches together.

------------

OKAY. So not as much a proper pattern than it is a formula. The trick here is that this formula is very versatile and not to fuss too much over the technicality of it. ;)

xo

22.2.13

Easy DIY Bedspread

Easy DIY Bedspread
Easy DIY Bedspread
Easy DIY Bedspread
Easy DIY Bedspread
Audrey is officially in her big girl bed! To celebrate the occasion I made a special new bedspread for Audrey as a present for being such a big girl now. The bedspread matches her bed sheet which she is particularly fond of. It's simple and lightweight. Since it's not too heavy it's easy enough for a toddler to cover herself with it at night.

Quick instructions to how I made mine after the jump: